Introduction
Google Sheets is likely one of the hottest and broadly used alternate options to Excel. Its collaborative setting presents options similar to real-time enhancing, and model management, and its tight integration with Google Suite which lets you name Google Sheets in Google Docs, helps to deliver one of the best of the Google workspace. You may simply load and work with Excel information programmatically utilizing Pandas, some of the common information science libraries. Equally, you may replicate this setup with Google Sheets.
As Google Sheets is a SaaS providing, one must entry Google Sheets information utilizing its API. You may entry the API utilizing varied programming languages, together with Java, JavaScript, Node.js, PHP, Ruby, Python, and Google’s personal AppScript. For this text, we’ll concentrate on utilizing Python. By leveraging Python, we are able to effectively load Google Sheets information into Pandas information frames, a robust software for information manipulation. This permits us to carry out transformations and analyses shortly. As soon as our adjustments are full, we are able to push them again to Google Sheets utilizing the gspread Python library, which gives a handy interface for connecting to and interacting with the Google Sheets API.
Studying Targets
- Perceive the way to arrange a Google Cloud mission and create a service account for Google Sheets API entry.
- Discover ways to use the gspread library to work together with Google Sheets Automation utilizing Python.
- Grasp the methods for creating, sharing, and managing Google Sheets and worksheets through Python scripts.
- Uncover strategies for inserting, updating, and deleting rows, columns, and cells in Google Sheets utilizing Python.
- Discover methods to fetch and manipulate cell values and ranges from Google Sheets Programmatically.
This text was printed as part of the Knowledge Science Blogathon.
Setting-up your Google Cloud Venture
As talked about earlier, Google Sheets is a SaaS providing, so you could put together additional steps for automation. Google Cloud Platform (GCP), a well-liked cloud computing platform, presents quite a lot of providers that assist to work together with Google merchandise together with the deployment of your customized tasks.
Broadly, we have to comply with these 3 steps to get began with Google Sheets automation.
Creating and Configuring a Google Cloud Venture
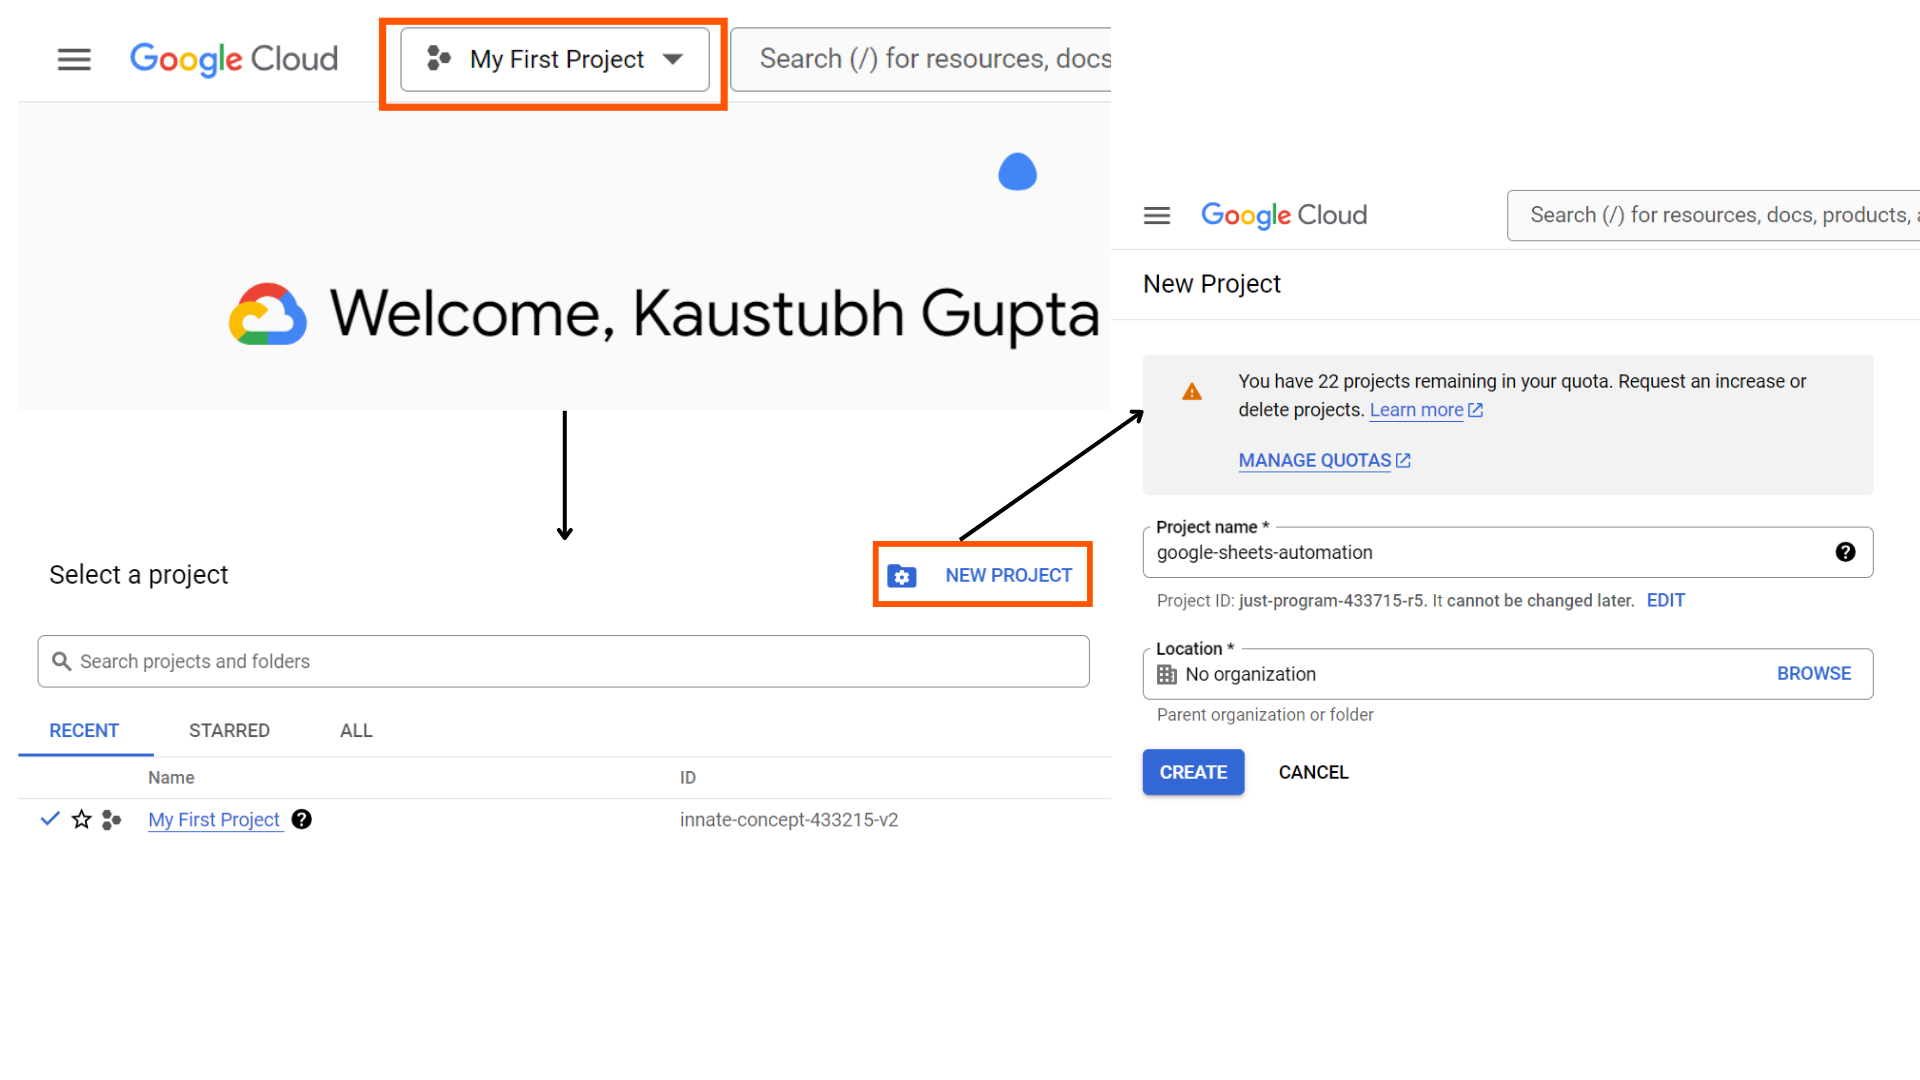
Head over to https://console.cloud.google.com/ and join a free account. Subsequent from the highest left, click on on the mission choice menu and choose new mission. Present a mission identify, leaving the group as “No group”, hit create and your GCP mission is ready now.
Producing and Securing API Credentials
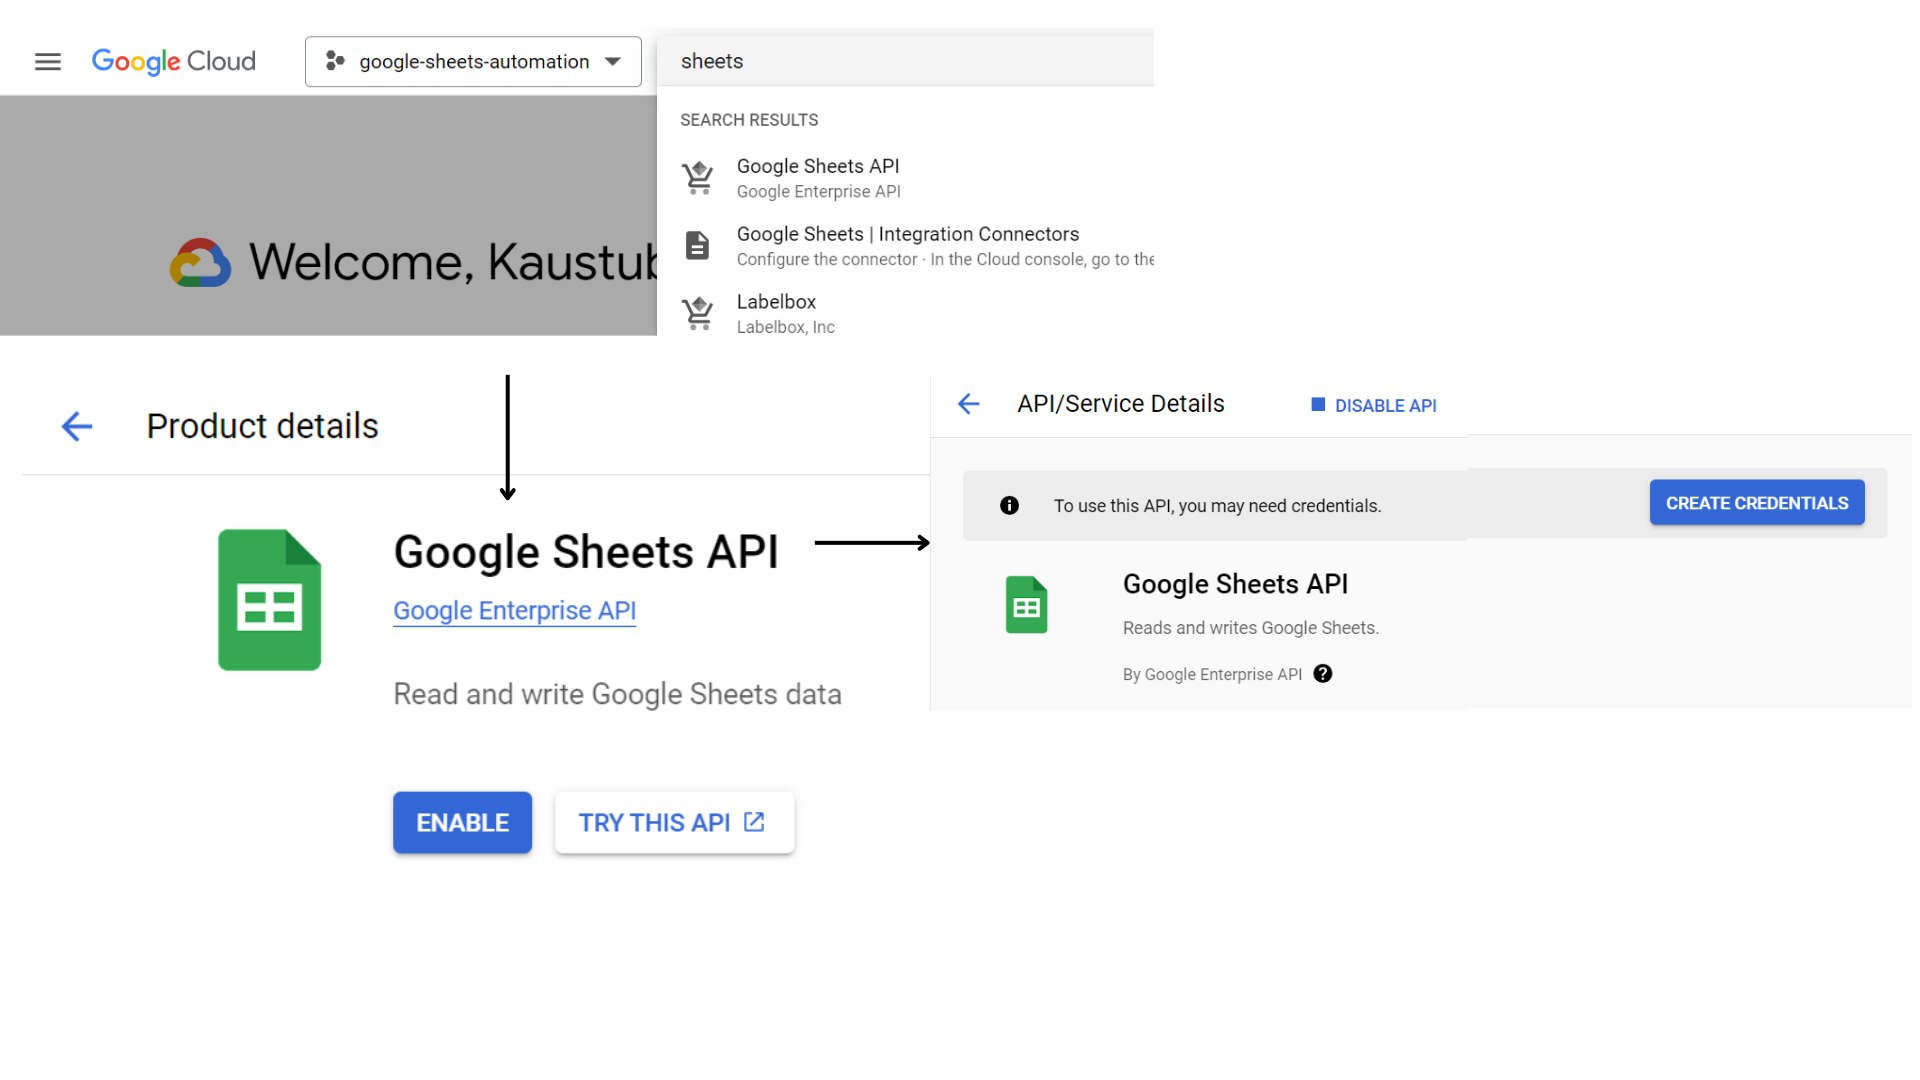
We have to allow the Google Sheets and Google Drive API and create a service account. This particular sort of account permits us to entry and handle Google Cloud assets with out requiring human interplay. To allow the Google Sheets API, seek for sheets within the prime search bar and choose “Google Sheets API”. Click on permit and it’ll redirect us to the API particulars web page. Right here click on on “Create Credentials” and it’ll open up the credentials creation type.
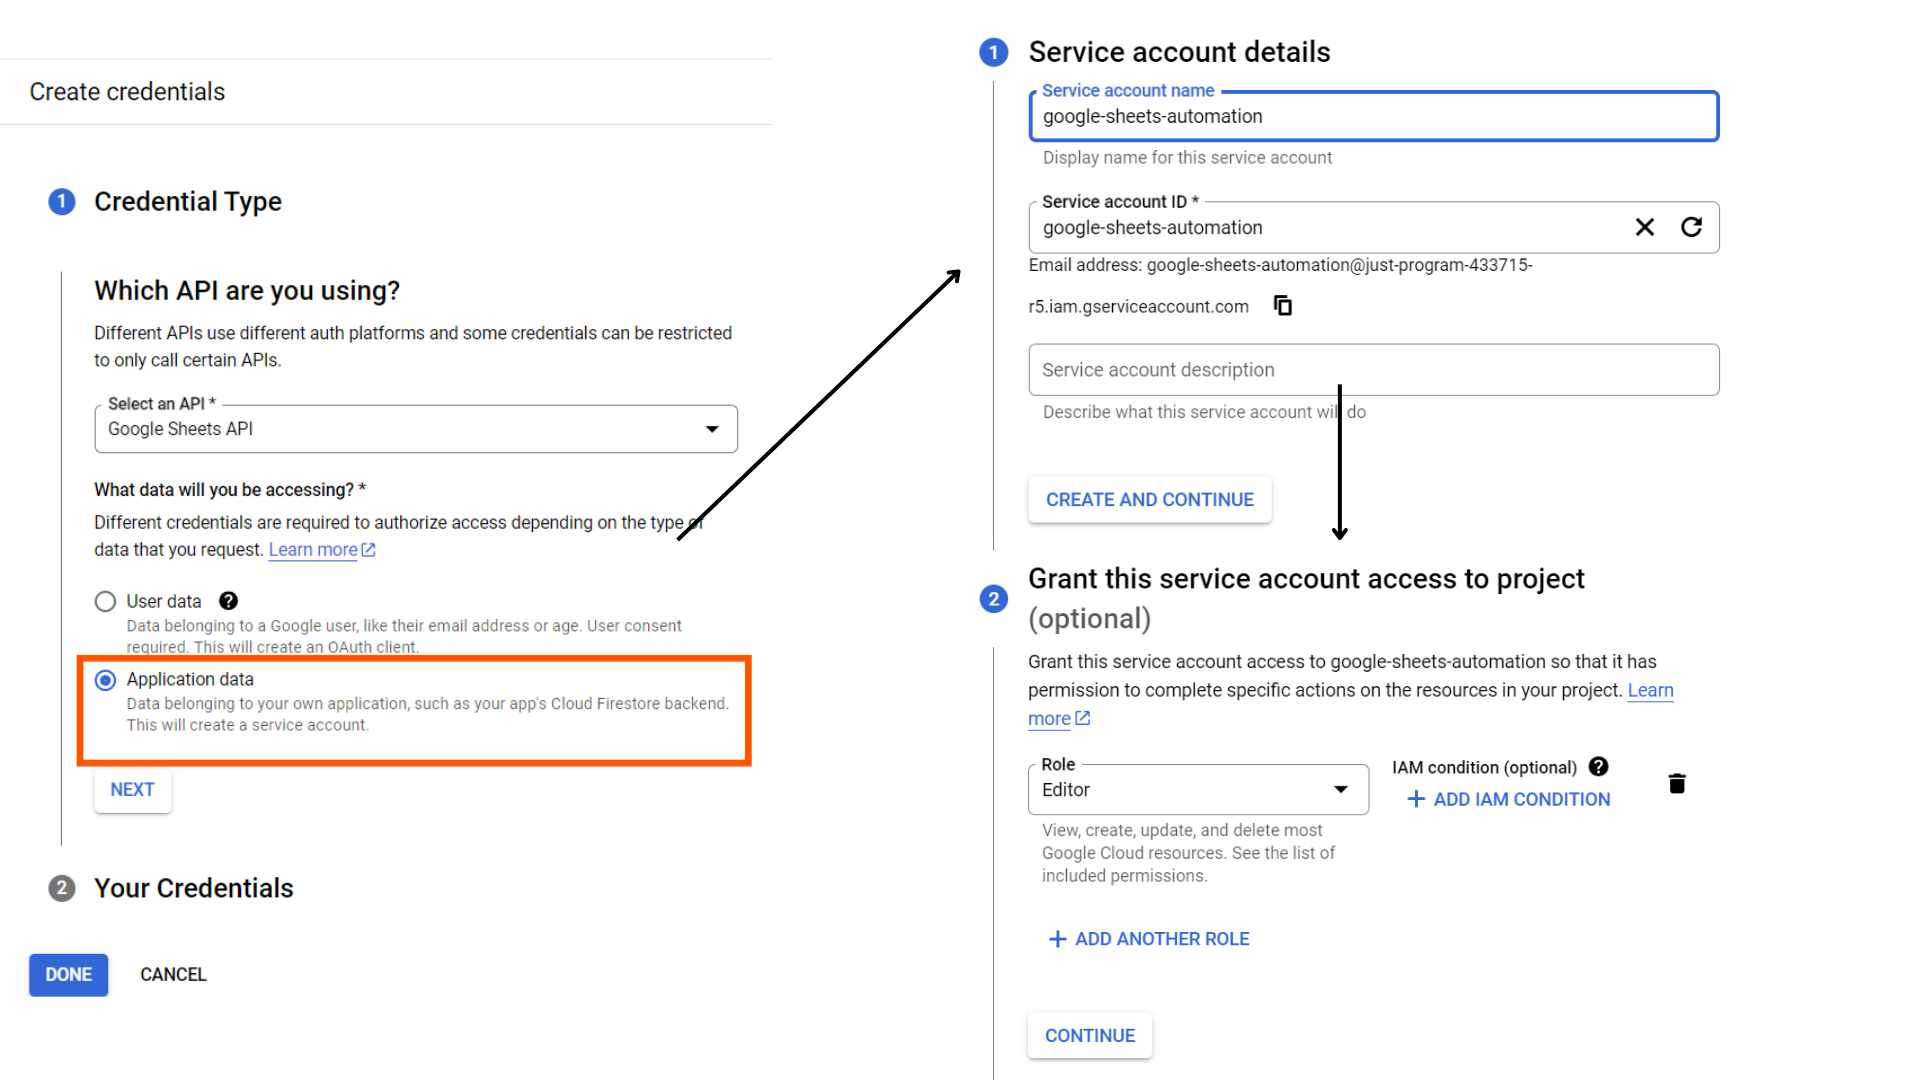
Choose “Software Knowledge” from the choice field and click on Subsequent. On the following display, present a significant identify for the service account, as you’ll use it in later steps. Then, choose the “Editor” function. Lastly, click on Finished on the backside.
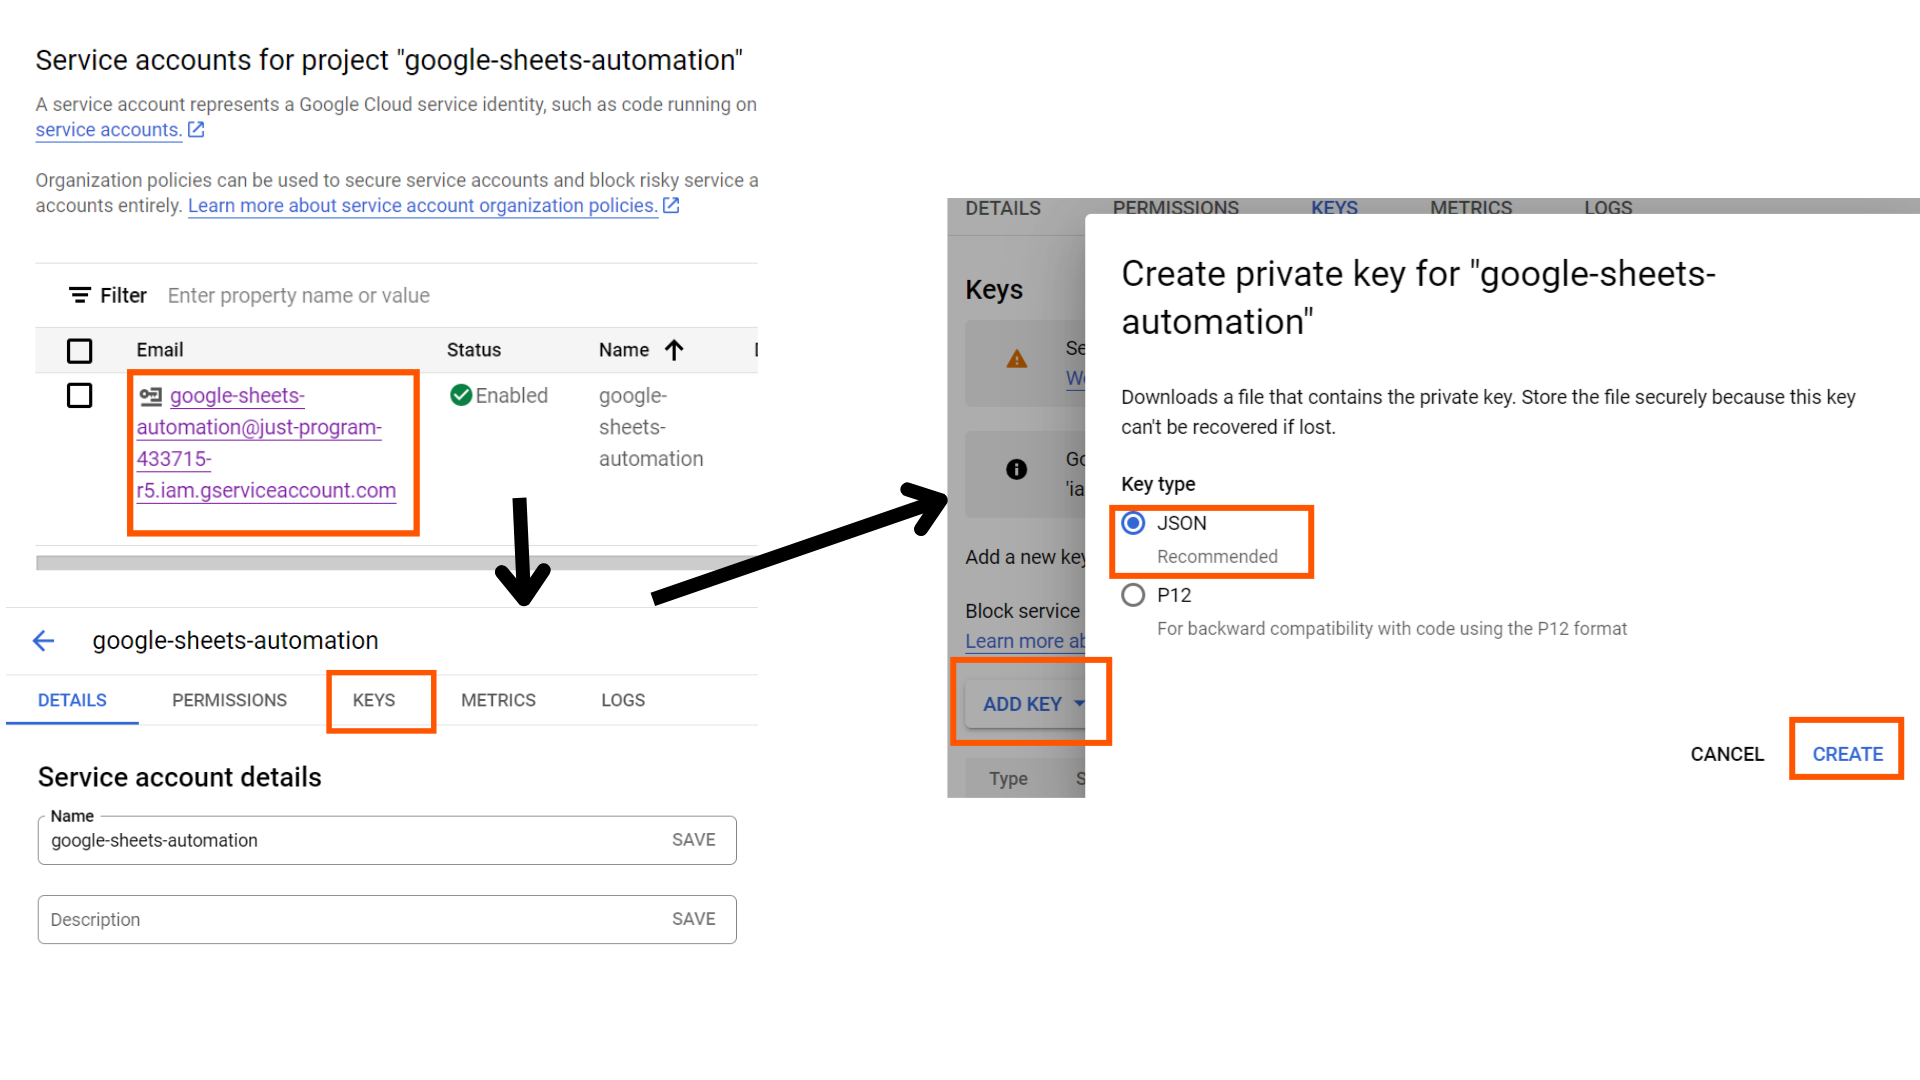
Equally, the Google Drive API may be enabled. Please be aware that we don’t have to create one other service account for this API. The prevailing service account will be capable to entry each APIs. Now, we have to obtain the credentials JSON, which our Python script will eat to entry Google Sheets. Click on on the newly generated service account electronic mail, swap to the keys tab, click on on the add key button to pick the create new key possibility, choose JSON, after which create.
Granting Entry to Google Sheets
Our Python script will use the generated credentials to entry Google Sheets. Nevertheless, we have to manually grant entry to the information that our script will use. To do that, copy the e-mail generated for the service account (discovered within the particulars tab of the service account) and add that electronic mail as an Editor to the specified information.
Understanding gspread
gspread is a Python API wrapper for Google Sheets. It encapsulates a number of functionalities provided by the Google Sheets API beneath separate lessons and entry strategies. It makes interplay with sheets API straightforward to navigate and one can shortly decide it up.
To arrange the library within the native setting, one can use a easy pip command, as with every different Python package deal. Set up the library in a separate setting as a finest follow to keep away from any dependency conflicts.
pip set up gspreadA fast be aware on cell references
The cell addresses in Google Sheets may be referenced utilizing two common notations:
- A1 notation: This cell reference consists of the sheet identify, row quantity, and column letter.This reference works with out mentioning the sheet identify and lets you check with a single cell, a variety of cells, or a complete column.
- Named vary: It is a outlined vary of cells having a customized identify for straightforward identification and simplified reference throughout the Google Sheet.
Establishing Connection and Opening Spreadsheet
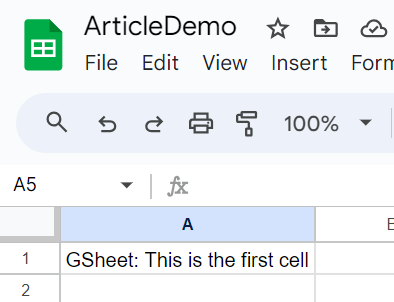
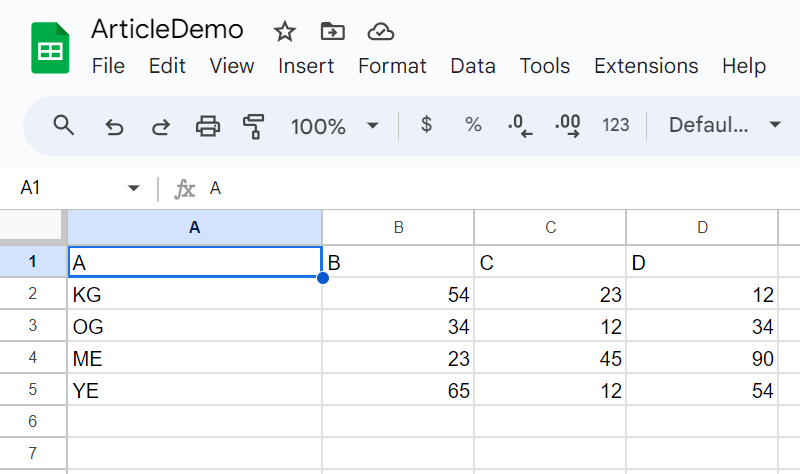
Now that now we have arrange the mandatory entry and libraries, let’s take a look at our code. Within the spreadsheet containing the service account electronic mail, enter some random textual content within the first cell. We’ll try to retrieve this worth utilizing our Python script.
We’ll use the JSON module to load our credentials and move it to the gspread’s “service_account_from_dict()” operate. It will return a Google Sheets consumer object and this object can be utilized to open any Google Sheet utilizing the “open()” operate. See the code under.
import gspread
import json

with open('creds.json') as f:
    credentials = json.load(f)

gc = gspread.service_account_from_dict(credentials)

sh = gc.open("ArticleDemo")
There are two other ways to open a Google Sheet as an alternative of a title identify. These other ways remove the title identify dependency as in Google Workspace, a number of information can have the identical title. Within the case of spreadsheets, if there are two information with the identical title, then the most recent file can be accessed by the API. We will entry the spreadsheets utilizing the file URL or the spreadsheet’s distinctive ID which proceeds the next hyperlink: “https://docs.google.com/spreadsheets/d/<unique_id>/edit”. Beneath is the code to entry the spreadsheet through URL or distinctive ID.
## Entry through distinctive ID
sh = gc.open_by_key("1R97twcM0FfFNSsrh_0FjDDg-HcQF5PLHbhRxu9pTV_Q")


## Entry through URL
sh = gc.open_by_url("https://docs.google.com/spreadsheets/d/1R97twcM0FfFNSsrh_0FjDDg-HcQF5PLHbhRxu9pTV_Q/edit?gid=0#gid=0")
The next code will learn the worth entered earlier within the sheet. The code working can be defined within the later sections of the article.
print(sh.sheet1.acell('A1').worth)It will return the worth current within the A1 cell within the sheet, which in our case is “GSheet: That is the primary cell”. Now we’re all set to deep dive into the gspread library and discover all of the obtainable choices.
Observe: The sh variable holds the spreadsheet object and will probably be referred to all through the information
Creating and Managing Google Sheets
There could possibly be many use instances the place a spreadsheet is created programmatically. One could possibly be constructing an answer to publish information and insights for his or her customers. Together with this, they may need to share this sheet immediately with the consumer.
- To create a brand new spreadsheet, use the
create()operate of the gspread consumer. Move the title of the brand new spreadsheet as a parameter, and if you wish to specify the situation, use thefolder_idparameter. - The brand new spreadsheet created is barely accessible by the service account consumer. It implies that the spreadsheet won’t be seen even to the consumer who created the service account. For this objective, we are able to use the “share()” operate of the spreadsheet object. This operate requires 3 necessary parameters: “email_address” (electronic mail deal with), “perm_type” (permission sort), and “function”. The permission sort can take the next values: consumer, group, area, or anybody. For many of the use instances, the consumer worth will work. The perm_type additionally has a hard and fast variety of acceptable values: ‘reader’, ‘commenter’, ‘author’, ‘fileOrganizer’, ‘organizer’, and ‘proprietor’. There are some extra elective parameters as effectively, providing a granular degree of data.
- “notify”: Boolean worth to manage if the consumer ought to get a notification of the file shared.
- “email_message”: String worth for the message to be despatched together with the notification electronic mail.
sh = gc.create('ArticleDemoTest') ## Creating a brand new spreadsheet
sh.share(email_address="[email protected]", perm_type="consumer", function="author", notify=True, email_message="It is a take a look at file")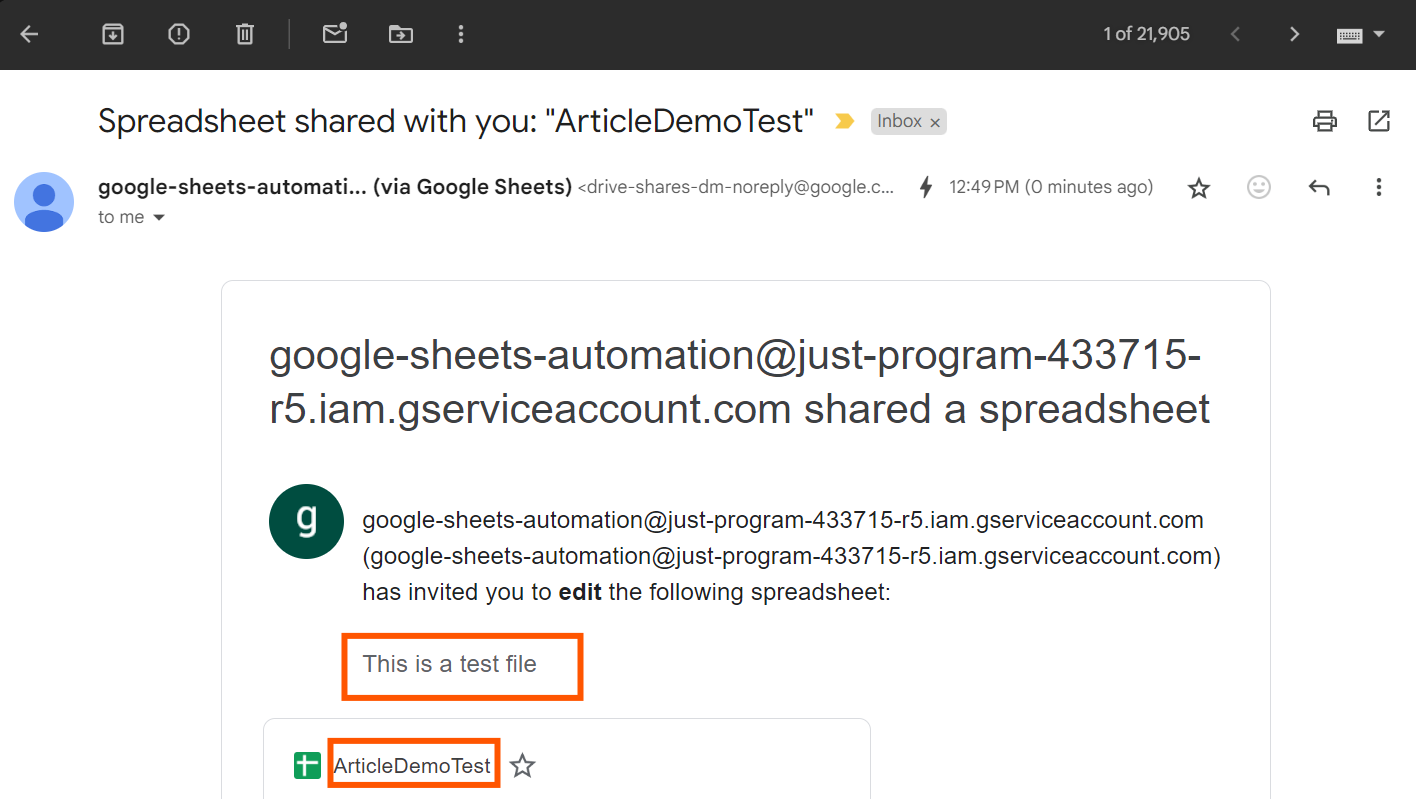
Managing Worksheets
Each spreadsheet is a group of worksheets. A easy analogy to that is how a e book has a number of pages. Utilizing gspread, customers can entry, modify, delete, or create new worksheets. Let’s check out every of those capabilities.
Worksheet Choice
The worksheet(s) of a spreadsheet object may be accessed utilizing the next strategies of the worksheet object:
- Entry by index: The “get_worksheet()” operate takes within the index of the worksheet that must be accessed.
- Entry by title: The “worksheet()” operate takes within the title of the worksheet. Do be aware that the worksheet titles are distinctive by nature and due to this fact, no two worksheets can have the identical title.
- Entry by dot notation shortcut: The dot notation shortcut permits accessing the primary worksheet of the spreadsheet with out giving out a title, index, or ID.
- Entry all: The “worksheets()” operate returns all of the worksheets of the spreadsheet. It returns them as gspread worksheet objects. The “title” and “id” are a couple of necessary properties of this class that assist in accessing desired worksheets in a bulk method.
- Entry by ID: Whereas creating automation scripts, there could be some use instances the place we’re coping with worksheet ID as an alternative of titles. In such situations, the “get_worksheet_by_id()” operate can be utilized.
Right here is the pattern code for all of the listed strategies.
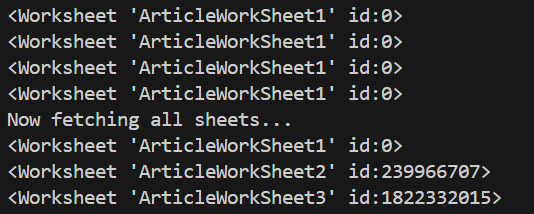
print(sh.get_worksheet(0))
print(sh.worksheet("ArticleWorkSheet1"))
print(sh.sheet1)
print(sh.get_worksheet_by_id(0))

print("Now fetching all sheets...")

## Returning all worksheets
for ws in sh.worksheets():
    print(ws)
All of those print statements return the worksheet object
Making a New Worksheet
Aside from present worksheets within the spreadsheet, we are able to programmatically create new worksheets in the identical spreadsheet. This method may be helpful when processing information from an present worksheet and publishing the ends in a separate worksheet.
To create a brand new worksheet, we have to use the “add_worksheet()” operate of the worksheet object. It takes the next parameters.
- title: The title of the worksheet
- rows, columns, index (elective): We have to outline the variety of rows and columns for the newly created worksheet. The “index” parameter is elective and it controls the ordering of the worksheet.
The under code will create a worksheet with 100 rows and 20 columns and place the worksheet within the second place.
sh.add_worksheet('ArticleWorkSheet1.5', rows=100, cols=20, index=1)
And it did place it within the second place (index + 1)

Renaming a Worksheet
You may rename worksheet titles utilizing the update_title() operate of the worksheet object, which accepts the brand new title as a parameter.
print(sh.worksheet("ArticleWorkSheet3").update_title("ArticleWorkSheet2.5"))
Deleting a Worksheet
A worksheet may be deleted from a spreadsheet utilizing the next operate of the worksheet object:
- Delete a worksheet utilizing the worksheet object: “del_worksheet()” operate takes the worksheet object as a parameter and deletes the worksheet from the spreadsheet.
- Delete a worksheet utilizing the worksheet ID: “del_worksheet_by_id()” operate takes the worksheet ID as enter for deleting the worksheet.
The choice of which operate to make use of will depend on the use case the script is made. Beneath is the code pattern demonstrating the utilization of each capabilities.
sh.del_worksheet(sh.worksheet("ArticleWorkSheet2.5"))
sh.del_worksheet_by_id('602396579')
Cell Properties
We’re slowly narrowing down from prime to backside and reaching the smallest (and most necessary) unit of our worksheet, a cell. A cell is an intersection of a row and a column. For gspread library, it holds the next properties:
- row: Row quantity for the cell
- col: Column quantity for the cell
- worth: The worth of the cell
- deal with: The deal with of the cell within the A1 notation
The under pattern code accesses all of the properties of a cell. The actual cell for inspection is returned utilizing the cell operate of the worksheet.
sampleCell = sh.worksheet("ArticleWorkSheet1").cell(row=1, col=1)
print('Row: {}nColumn: {}nValue: {}nAddress: {}'.format(sampleCell.row, sampleCell.col, sampleCell.worth, sampleCell.deal with))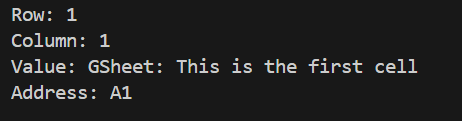
All these accessors will come into play as soon as we’re coping with higher-order capabilities of the library.
Including New Rows and Columns
Let’s start including new rows and columns to our present pattern worksheet to have some information to work on for the later sections of this information. The insertion as an operation is supported in two methods by the gspread library.
Insertion at a selected place
You may insert a row or column at a selected place utilizing the insert_row(), insert_rows(), and insert_cols() capabilities of the worksheet object. These capabilities permit us so as to add the row(s) or columns at a selected location in a worksheet. The operate specifics are as under:
- insert_row: The operate requires the “values” parameter as a listing of values to insert. The order of values within the record determines the order of the inserted rows. The “index” parameter, which defaults to 1, specifies the place for row insertion. Optionally available parameters like “value_input_option” and “inherit_from_before” management how the operate interprets the enter information and rows, and whether or not it ought to push the information immediately or parse it as if the consumer is typing within the UI.
- insert_rows: It takes the record of lists within the “values” parameter for inserting a number of rows. Every record acts as a single row. Internally, that is the precise implementation of how the rows are inserted into the worksheet through gspread. “The insert_row()” operate calls the “insert_rows()” operate and due to this fact, all of the parameters described for the “insert_row()” operate stand true for “insert_rows()” besides one parameter. Within the
insert_row()operate, you establish the offset utilizing theindexparameter, whereas within theinsert_rows()operate, you specify it with therowparameter. - insert_cols: This operate is a duplicate of the “insert_rows()” operate with a modified parameter identify for offset from “row” to “col”. The remainder of the elective parameter functioning stays the identical.
Insertion after a desk vary
This insertion is barely relevant to rows. It permits us to insert rows after a selected desk vary, the place the place is unknown. Once more, the insertion may be carried out in a single or multi-row method.
- append_row: It takes within the row values as a listing through the “values” parameter. The “table_range” parameter helps outline the desk vary after which the row insertion ought to occur. The vary is given in A1 notation.
- append_rows: Likewise the “insert_rows()”, the “append_rows()” is the precise implementation of rows insertion after a desk vary. All of the parameters for each capabilities stay the identical with the distinction that “append_rows()” takes a listing of lists within the “values” parameter.
Right here is the pattern code that:
- Provides a row for columns: A, B, C, and D
- Provides 4 rows beneath these columns
sampleWorksheet.insert_row(
    ['A', 'B', 'C', 'D']
)
sampleWorksheet.insert_rows(
    [
        ['KG', 54, 23, 12],
        ['OG', 34, 12, 34],
        ['ME', 23, 45, 90],
        ['YE', 65, 12, 54]
    ], row=2
)
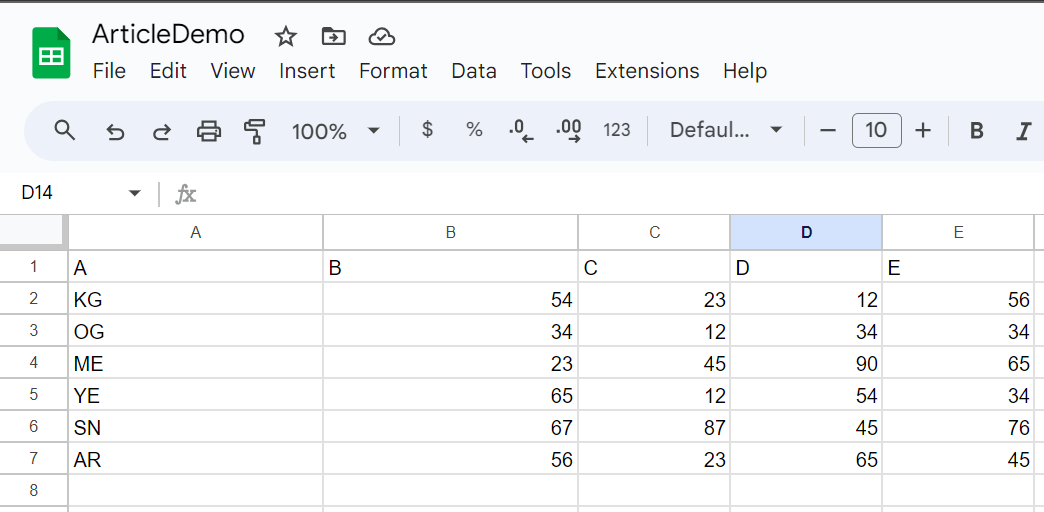
Now, let’s do the next steps on prime of this:
- Append 2 rows to proceed on this desk vary
- Add one other column E
sampleWorksheet.append_rows(
    [
        ['SN', 67, 87, 45],
        ['AR', 56, 23, 65]
    ],
    table_range="A1:D5"
)
sampleWorksheet.insert_cols(
    [
        ['E', 56, 34, 65, 34, 76, 45]
    ],
    col=5
)
Observe: The sampleWorksheet variable holds the worksheet object and will probably be referred to all through the information.
Fetching Cells and Ranges Values
Within the final sections, now we have ready our information programmatically utilizing varied insertion operations. Now, we are able to fetch the information inserted utilizing varied learn capabilities. We’ll see the way to fetch cells after which transfer to fetch values from a variety of cells and the whole worksheet.
Fetching Single Cell
Probably the most primary learn operation on a worksheet entails getting the worth or some other cell property as described within the earlier sections. To fetch a single cell, there are two capabilities:
- acell: This takes the cell deal with within the A1 notation and returns a cell object.
- cell: This takes the cell coordinates within the order of (row, column).
Each these capabilities return a cell object and now we have already seen the way to get the worth from these objects. The acell operate was used within the part the place we established a reference to the Google Sheets API.
print(sampleWorksheet.acell('A1').row)
print(sampleWorksheet.cell(1, 1).worth)
Fetching all Cells of the Worksheet or Vary
- We will get all of the cells of the worksheet in a listing of cell objects utilizing the “get_all_cells()” operate of the worksheet object. There isn’t a parameter for this operate and it may be immediately referred to as on a worksheet object.
- To fetch cell objects for a selected vary, use the
vary()operate of the worksheet object. This operate accepts varied enter varieties, similar to A1 notation, numeric boundaries, or named ranges. If used with out enter, it returns all cells within the worksheet in a single API name. To be used instances involving cell properties, this operate helps filter out the specified cells and carry out additional actions.
print(sampleWorksheet.get_all_cells())
print(sampleWorksheet.vary('B4:E5'))
Fetching Values of Vary of Cells
Customers normally create a number of miniature tables in the identical worksheet for higher accessibility. In such instances, we have to refine our fetching vary to the precise addresses of those desk ranges. To fetch such desk ranges, we are able to use the next two capabilities of the worksheet object:
- get: The “get()” operate takes the desk vary in A1 notation or a named vary and returns the record of lists of values.
- batch_get: The “get()” operate can solely take one vary, but when we’re coping with a number of ranges, we are able to use batch_get. This operate makes one API name, saving up value.
print('Get Vary: {}'.format(sampleWorksheet.get("A1:D4")))
print('Batch Get Vary: {}'.format(sampleWorksheet.batch_get([
    "A1:D4",
    "B4:E3"
]))
Fetching all Values from a Row or Column
We will fetch all of the values of a row or column utilizing the “row_values()” and “col_values()” capabilities of the worksheet object. Each capabilities take the place (numbering from 1) of a row or column and return the values in a listing.
print(sampleWorksheet.row_values(1))
print(sampleWorksheet.col_values(4))
Fetching Complete Worksheet Values
The most effective use instances of fetching a complete worksheet could be to load this information immediately right into a pandas information body after which do the post-processing or evaluation as per the requirement. Your entire information may be returned utilizing following capabilities of the worksheet object:
- Record of Lists: The “get_all_values()” operate returns each row as a listing after which all rows lists in a single record. This operate is an alias to the “get_values()” operate however curiously, the “get_values()” operate is applied utilizing the “get()” operate. The “get()” operate with none inputs returns the record of lists. Due to this fact all 3 capabilities are the identical.
- Record of Dictionaries: The “get_all_records()” operate returns a listing of dictionaries. Every dictionary is a key-value mapping the place the keys are the first-row values and the values because the next-row values. Each row will get its dictionary. By default, it assumes that the primary row is the important thing however we are able to make it conscious of a unique row as a key utilizing the “header” parameter. There are some extra parameters as effectively that may assist in dealing with empty cells, and anticipated headers.
You may immediately move the outputs of each capabilities to the Pandas DataFrame operate to acquire the worksheet desk as a Pandas DataFrame.
import pandas as pd
print(pd.DataFrame(sampleWorksheet.get_all_records()))
print(pd.DataFrame(sampleWorksheet.get_all_values()))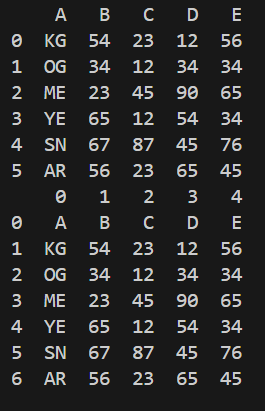
Updating Cells and Ranges
Updating the prevailing information of the spreadsheet is probably the most essential operate that may be carried out simply utilizing gspread library capabilities. There are a number of methods to replace the cells of a spreadsheet, single cell updation to a number of cells of a variety after which to a number of ranges with a single API name.
Updating a Single Cell
A single cell of a worksheet may be up to date utilizing the next capabilities of the worksheet object.
- update_acell: This operate takes two parameters, the cell deal with within the A1 notation and the worth to be up to date
- update_cell: This operate takes the coordinates of the cell within the row-column order and the worth for updation
- replace: Though this operate has an even bigger scope for updating a number of cells, it can be used to replace a single cell. The enter parameters order is totally different from the above two capabilities. The “replace()” operate takes a listing of lists as the primary worth after which the cell deal with.
print(sampleWorksheet.update_acell('A2', 'Kaustubh'))
print(sampleWorksheet.update_acell('A3', 'Oggy'))
print(sampleWorksheet.replace([['Hello']], 'A4'))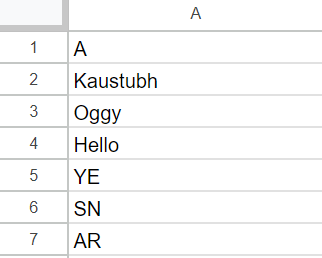
Updating a Vary of Cells
You may replace a variety of cells in a worksheet utilizing the next two capabilities from the worksheet object.
- update_cells: This operate works finest together with the “vary()” operate. The “update_cells()” operate takes enter because the record of cells. This record of cells can have their values modified by looping over the cell objects returned from the vary operate and accessing their worth property.
- replace: As beforehand seen in single-cell updates, you should utilize this operate to replace a named vary or an A1-notated vary.
rangeOfCells = sampleWorksheet.vary('B2:B7')
for cell in rangeOfCells:
    newValue = int(cell.worth) + 10
    cell.worth = newValue
print(sampleWorksheet.update_cells(rangeOfCells))
The above code fetches a variety of cells, provides 10 to their worth, and updates them in a single API name.
Updating A number of Vary of Cells
Within the above part, we have been in a position to replace a number of cells in a variety with a single API name. This habits may be prolonged to a number of ranges as effectively. It means we are able to replace a number of teams of cells with one name. The “batch_update()” operate takes a listing of dictionaries with keys as vary and values. The vary key worth needs to be the A1 notation vary or a named vary and the values key worth because the record of record of values.
range1 = 'C2:C7'
range2 = 'E2:E7'
bothRangeValues = sampleWorksheet.batch_get([
    range1,
    range2
])
range1Values, range2Values = bothRangeValues
range1UpdatedValues = [[int(x[0]) + 10] for x in range1Values]
range2UpdatedValues = [[int(x[0]) + 20] for x in range2Values]
print(sampleWorksheet.batch_update([
    {
        'range': range1,
        'values': range1UpdatedValues
    },

    {
        'range': range2,
        'values': range2UpdatedValues
    }
]))
The above code fetches two ranges utilizing the “batch_get()” operate, then updates their values domestically, after which makes use of the “batch_update()” operate to push again the up to date values to the Google Sheets. The output of this replace appears like this:

Deleting Rows and Columns
Until this level, now we have inserted, learn, and up to date the information within the worksheet. We will carry out delete operations to take away redundant or pointless information from the worksheet. The “delete_rows()” and “delete_colums()” operate takes the “start_index” to be deleted. If “end_index” is specified, then it deletes all of the columns within the index vary of begin and finish.
print(sampleWorksheet.delete_columns(4))
print(sampleWorksheet.delete_rows(6))
Looking out Cells
The Google Sheets API allows you to seek for cells by matching a string or a daily expression. You may carry out case-sensitive or case-insensitive searches and slim the search to particular rows or columns if desired. Use these two worksheet capabilities to search out matching cells:
- discover: The “discover()” operate returns the primary incidence of the match. This takes within the search string or a regex, “in_row” or “in_column” parameters to slim down the search and the “case_sensitive” flag to manage the search sort. The “in” parameters take the row or column positions (index + 1)
- findall: The “findall()” is the superior stage of the “discover()” operate the place it returns all of the matches of the search.
import re
print(sampleWorksheet.discover('64', in_column=2))
searchRe = re.compile(r'(a|A)')
print(sampleWorksheet.findall(searchRe))
Formatting Cells
In Excel, you may format worksheets in varied methods, together with textual content highlights, formatting, borders, alignment, and quite a few capabilities. The Google Sheets additionally presents quite a lot of formatting choices for cells. The entire record of fields is on the market in Google Sheets Cells documentation.
You need to use the format() operate of the gspread worksheet object to specify the cell or vary the place you need to apply formatting. Present the format as a JSON dictionary, which incorporates all of the formatting key fields and their values.
The under code will apply borders to all of the cells of the desk.
borderFormatting = {
    "model": "SOLID",
    "colorStyle": {"rgbColor": {"pink": 0, "inexperienced": 0, "blue": 0, "alpha": 1}},
}

print(
    sampleWorksheet.format(
        "A1:D6",
        format={
            "borders": {
                "prime": borderFormatting,
                "backside": borderFormatting,
                "left": borderFormatting,
                "proper": borderFormatting,
            },
        },
    )
)
We will additionally apply batch formatting to format a number of ranges on the similar time. This protects a number of time writing totally different format calls for each new change. The “batch_format()” operate takes the record of dictionaries containing two necessary keys. The primary key’s the vary key which defines the cell’s scope and the format key which comprises the formatting dictionary.
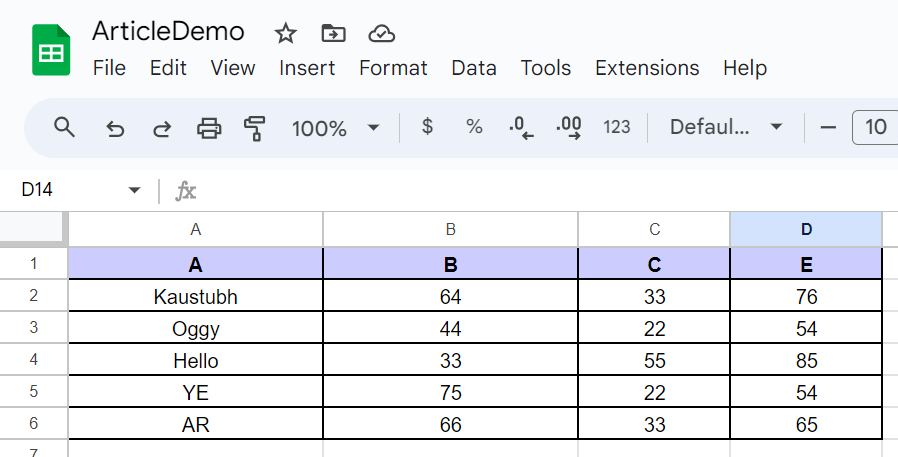
Let’s do the next on our pattern desk utilizing the “batch_format()” operate:
- Apply borders to all of the cells of the desk.
- Daring the textual content of the primary row, indicating that these are the columns of our desk.
- Align all the information within the middle.
- Add a lightweight blue colour for the columns (the primary row).
borderFormatting = {
    "model": "SOLID",
    "colorStyle": {"rgbColor": {"pink": 0, "inexperienced": 0, "blue": 0, "alpha": 1}},
}
codecs = [
    {
        "range": "A1:D6",
        "format": {
            "borders": {
                "top": borderFormatting,
                "bottom": borderFormatting,
                "left": borderFormatting,
                "right": borderFormatting,
            },
            "horizontalAlignment": "CENTER",
        },
    },
    {
        "range": "A1:D1",
        "format": {
            "textFormat": {
                "bold": True,
            },
            "backgroundColorStyle": {
                "rgbColor": {"red": 0.8, "green": 0.8, "blue": 1, "alpha": 0.8}
            },
        },
    },
]

print(sampleWorksheet.batch_format(codecs))
And that is the ultimate state of our desk.
Clear Vary of Cells and Worksheet
It could be potential that we need to clear the vary earlier than finishing up the operations. For clearing the cell ranges, the “batch_clear()” operate of the worksheet object can be utilized. This takes the record of ranges that should be cleared. Let’s clear column C from our pattern desk.
print(sampleWorksheet.batch_clear(["C1:C6"]))
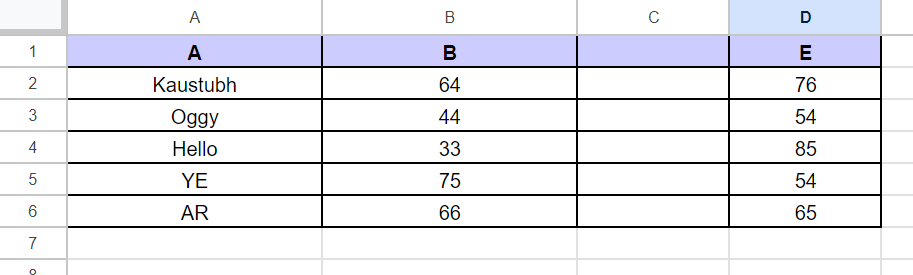
Observe: Clear operate solely clears the values and never the formatting utilized.
Your entire worksheet may be cleared utilizing the “clear()” operate of the worksheet object.
print(sampleWorksheet.clear())Limitations of Google API
We’ve got carried out a number of operations on Google Sheets utilizing the gspread library. This library is only a wrapper that prepares the user-passed information into the format that’s acceptable and makes the API calls to Google tasks related to the sheets.It really works in order that the developer doesn’t want to grasp the underlying API calls, payloads, and responses. The developer interacts solely with the abstracted capabilities.
Whereas that is good for builders who’re simply enjoying round, for manufacturing and significant duties, a developer wants to grasp how the API calls are consuming the quota. Whereas the utilization of Google Sheets API is free, there are some restrictions to what number of API calls may be made.
Resulting from such limitations, a number of customers encounter the well-known 429 error that reads as “Too many requests”. For instance, the present quota is 300 requests per minute per mission. For some motive, in case your script is sending greater than 300 requests, then the extra requests won’t be processed. Exponential backoff is one such technique that implements a retry mechanism primarily based on producing random wait instances. Such mechanisms may be deployed to deal with these limitations.
Conclusion
On this information we created a Google Service account to carry out all of the operations one would carry out on the Google Sheets UI. We explored a number of capabilities similar to including, updating, and deleting information. We additionally explored the way to format sheets and Google Sheets Automation utilizing Python.
The Google Sheets API presents much more functionalities similar to merging cells, making protected ranges, hiding cells, including notes, copy ranges, and even including filters, all operations programmatically! Whereas the documentation for the gspread library lacks these explanations, one can go forward to discover the Google Sheets official documentation and likewise verify the API reference part of the gspread documentation that provides high-level details about all of the capabilities applied within the library.
Key Takeaways
- Google Sheets automation requires establishing a Google Cloud Venture, which incurs no value. Nevertheless, in the event you don’t optimize the code, you may exhaust the quota, resulting in errors later within the code. Intention to make use of the batch operate wherever potential.
- There are a lot of prospects of what may be achieved utilizing Google Sheets API and the gspread library is simply a place to begin. One ought to discover the official documentation to implement the functionalities lacking within the library (and possibly contribute again)
- You need to use Google Sheets automation setups to construct sourcing pipelines that preserve a grasp document and push it to a extra superior database, like an OLAP database. Join these databases to BI software program, similar to Tableau, to finish an end-to-end mission.
- Google Sheets automations can assist you remove handbook information entry by establishing workflows that robotically replace, import, or set up information, considerably enhancing effectivity.
- Utilizing Google Sheets automations, you may schedule recurring duties similar to sending experiences, performing calculations, or updating cells, lowering the necessity for repetitive handbook actions.
If you wish to learn/discover each article of mine, then head over to my grasp article record.
I hope you preferred my article. For any doubts, queries, or potential alternatives, you may attain out to me through LinkedIn — in/kaustubh-gupta
Continuously Requested Questions
A. A retry mechanism needs to be applied that tries to make the requests once more in a while. One such instance is the exponential backoff algorithm
A. batch_get, batch_update, batch_format, and batch_clear are among the generally used batch capabilities.
A. You need to use the format() and batch_format() capabilities to move the vary of cells and the formatting to be utilized in a dictionary. The dictionary comprises varied fields that you could format.
A. You may arrange Google Sheets automations utilizing built-in instruments like Macros and Google Apps Script. Macros help you document actions and replay them, whereas Google Apps Script enables you to create customized automations utilizing JavaScript. These automations can streamline repetitive duties similar to information entry, formatting, or working particular capabilities robotically in Google Sheets.
A. Well-liked Google Sheets automations for information evaluation embody automated information import from exterior sources, scheduled experiences utilizing Google Apps Script, and conditional formatting to spotlight tendencies. These automations assist optimize the information evaluation course of, making Google Sheets a robust software for managing and decoding giant datasets effectively.
The media proven on this article shouldn’t be owned by Analytics Vidhya and is used on the Creator’s discretion.
Kaustubh Gupta is a talented engineer with a B.Tech in Data Know-how from Maharaja Agrasen Institute of Know-how. With expertise as a CS Analyst and Analyst Intern at Prodigal Applied sciences, Kaustubh excels in Python, SQL, Libraries, and varied engineering instruments. He has developed core elements of product intent engines, created gold tables in Databricks, and constructed inside instruments and dashboards utilizing Streamlit and Tableau. Acknowledged as India’s Prime 5 Group Contributor 2023 by Analytics Vidhya, Kaustubh can be a prolific author and mentor, contributing considerably to the tech neighborhood by way of talking classes and workshops.