Introduction
On this fast-changing panorama of AI, effectivity and scalability turn out to be paramount. Builders are actively reaching out to these fashions that present excessive efficiency at a lowered value with decrease latency and higher scalability. Enter Gemini Flash 1.5 a brand new launch that retains all the nice options of Gemini 1.1 and affords even higher efficiency for a lot of image-related duties. Particularly, As part of the Gemini 1.5 launch, which additionally contains the Gemini 1.5 Professional variant, Flash 1.5 stands out as a mannequin to make quick, environment friendly, and high-volume duties attainable. Now, let’s take into account the significance of Gemini Flash 1.5 on this weblog and make a Meals Imaginative and prescient WebApp with Flask.
Studying Outcomes
- Perceive the important thing options and efficiency enhancements of Gemini Flash 1.5.
- Learn to combine and use the Gemini Flash 1.5 mannequin in a Flask net software.
- Acquire insights into the significance of light-weight AI fashions for high-volume duties.
- Uncover the method of making a Meals Imaginative and prescient WebApp utilizing Flask and Gemini Flash 1.5.
- Discover the steps for configuring and utilizing Google AI Studio’s Gemini Flash 1.5.
- Establish the advantages of utilizing JSON schema mode for structured AI mannequin outputs.
This text was printed as part of the Knowledge Science Blogathon.
Want for Light-weight AI Fashions
With the mixing of AI into totally different industries, quick and environment friendly fashions to course of excessive quantities of information are subsequently wanted. Conventional AI fashions are very resource-intensive, often excessive in latency, and low in scaling. This creates an enormous problem, particularly to builders engaged on functions that require real-time responses or that are field-deployed on resource-constrained environments akin to cell gadgets or edge computing platforms.
Recognizing these challenges, Google launched the Gemini Flash 1.5 mannequin—a light-weight AI answer tailor-made to satisfy the wants of contemporary builders. Gemini Flash 1.5 is designed to be cost-efficient, quick, and scalable, making it a really perfect selection for high-volume duties the place efficiency and value are crucial issues.
Key Options of Gemini Flash 1.5
- Enhanced Efficiency and Scalability: Some of the important updates in Gemini Flash 1.5 is its give attention to efficiency and scalability. Google has elevated the speed restrict for Gemini Flash 1.5 to 1000 requests per minute (RPM), a considerable enchancment that enables builders to deal with extra important workloads with out compromising on pace. Moreover, the elimination of the each day request restrict additional enhances its usability, enabling steady processing with out interruptions.
- Tuning Help: Customization and adaptableness are key parts of profitable AI implementations. To assist this, Google is rolling out tuning assist for Gemini Flash 1.5, permitting builders to fine-tune the mannequin to satisfy particular efficiency thresholds. Tuning is supported each in Google AI Studio and straight through the Gemini API. This characteristic is especially helpful for builders seeking to optimize the mannequin for area of interest functions or particular knowledge units. Importantly, tuning jobs are freed from cost, and utilizing a tuned mannequin doesn’t incur further per-token prices, making it a beautiful possibility for cost-conscious builders.
- JSON Schema Mode: One other notable characteristic in Gemini Flash 1.5 is the introduction of JSON schema mode. This mode provides builders extra management over the mannequin’s output by permitting them to specify the specified JSON schema. This flexibility is essential for functions that require structured output, akin to knowledge extraction, API responses, or integration with different programs. By conforming to a specified schema, Gemini Flash 1.5 will be seamlessly built-in into present workflows, enhancing its versatility.
Getting Began with Flask
Flask is a light-weight micro net framework that enables builders to construct net functions utilizing Python. It’s referred to as a “micro” framework as a result of it doesn’t require a variety of setup or configuration, not like different frameworks like Django. Flask is ideal for constructing small to medium-sized net functions, prototyping, and even large-scale functions with the proper structure.
Key Options of Flask
- Light-weight: Flask has a small codebase and doesn’t require a variety of dependencies, making it simple to be taught and use.
- Versatile: Flask can be utilized for constructing a variety of net functions, from easy net pages to complicated net companies.
- Modular: Flask has a modular design, making it simple to increase and customise.
- Unit Testing: Flask has built-in assist for unit testing, making it simple to put in writing and run assessments.
Getting Began with Flask
Flask is a light-weight micro net framework that enables builders to construct net functions utilizing Python. It’s excellent for constructing small to medium-sized net functions, prototyping, and even large-scale functions with the proper structure.
Key Options of Flask
- Light-weight: Small codebase with minimal dependencies, simple to be taught and use.
- Versatile: Appropriate for a variety of net functions.
- Modular: Straightforward to increase and customise.
- Unit Testing: Constructed-in assist for unit testing.
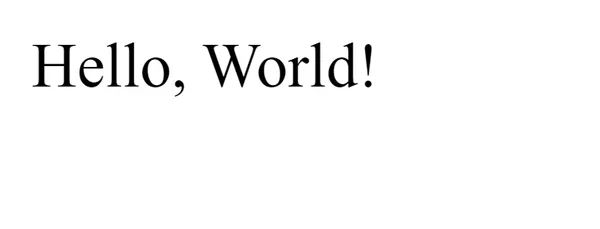
Flask App Instance
from flask import Flask

app = Flask(__name__)

@app.route("https://www.analyticsvidhya.com/")
def hello_world():
    return "<p>Hiya, World!</p>"

if __name__ == "__main__":
    app.run(debug=True)
Output:
Learn the Flask Documentation for extra particulars
Meals Imaginative and prescient WebApp: Overview of Undertaking Group
The Meals Imaginative and prescient WebApp is organized into a number of key parts: a digital surroundings folder (myenv/), static information for frontend property (static/), HTML templates (templates/), and a foremost software file (app.py). The .env file shops delicate configuration particulars. This construction ensures a clear separation of issues, making the undertaking simpler to handle and scale.
Folder Construction
This part outlines the folder construction of the Meals Imaginative and prescient WebApp, detailing the place varied parts are situated. Understanding this group is essential for sustaining and increasing the appliance effectively.
myenv/             # folder for digital surroundings
│
static/            # Folder for static information
│   ├── scripts.js
│   └── types.css
│
templates/         # Folder for HTML templates
│   └── index.html
│
.env               # Surroundings variables file
app.py             # Essential software file
Create a Digital Surroundings
Making a digital surroundings ensures that your undertaking dependencies are remoted from the worldwide Python surroundings. Observe these steps to arrange and activate a digital surroundings for the Meals Imaginative and prescient WebApp.
python -m venv myenvActivate in Home windows (Command Immediate)
.myenvScriptsactivateActivating in Home windows (PowerShell)
.myenvScriptsActivate.ps1Activate in macOS/Linux (Bash/Zsh)
supply myenv/bin/activateSet up these Dependencies
Set up the required Python packages to run the Meals Imaginative and prescient WebApp successfully. These dependencies embody libraries for net improvement, picture processing, and surroundings administration.
pip set up google-generativeai
pip set up flask
pip set up pillow
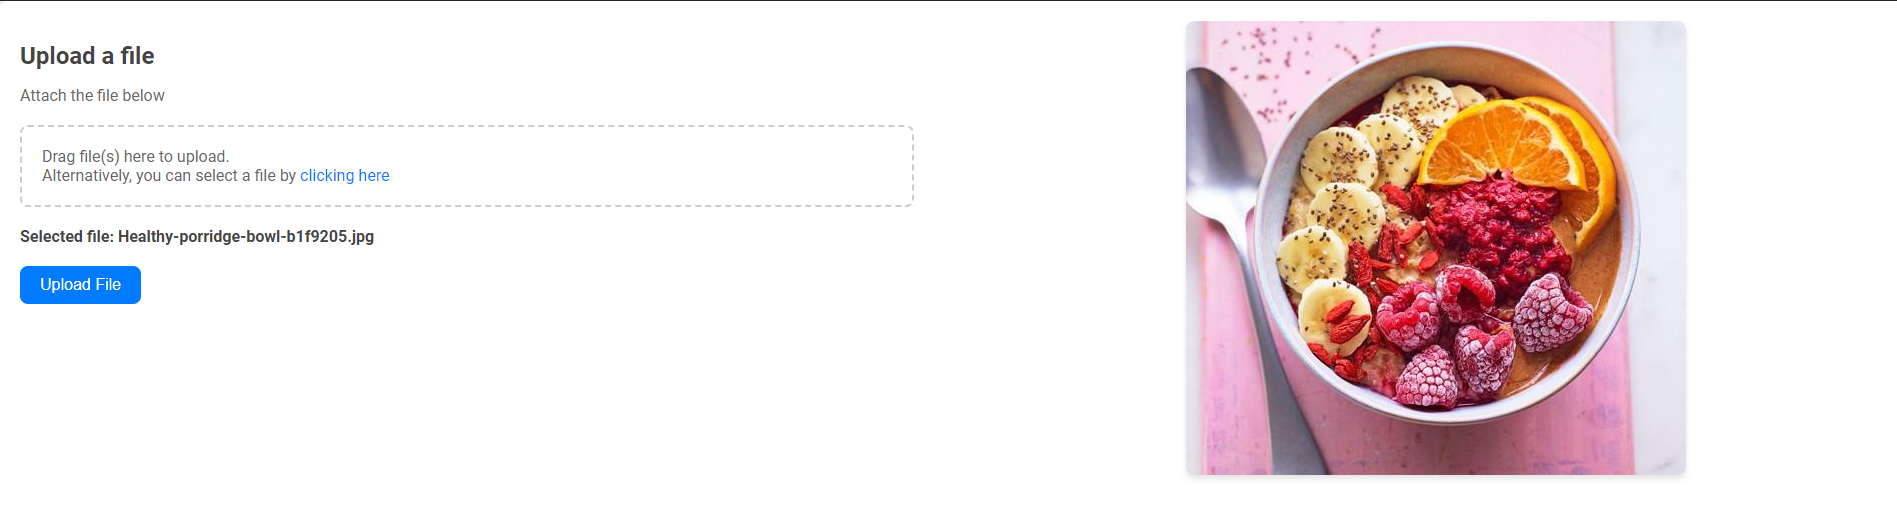
pip set up python-dotenvHTML Template: Designing the Person Interface
The HTML template gives the construction for the Meals Imaginative and prescient WebApp’s front-end. This part covers the format, file add type, and placeholders for displaying the uploaded picture and outcomes.
<!-- templates/index.html -->
<!DOCTYPE html>
<html lang="en">
<head>
    <meta charset="UTF-8">
    <meta title="viewport" content material="width=device-width, initial-scale=1.0">
    <title>Nutrify</title>
    <hyperlink rel="stylesheet" href="https://www.analyticsvidhya.com/weblog/2024/08/building-a-food-vision-webapp-with-the-gemini-flash-1-5-model/{{ url_for("static', filename="types.css") }}">
    <script src="https://www.analyticsvidhya.com/weblog/2024/08/building-a-food-vision-webapp-with-the-gemini-flash-1-5-model/{{ url_for("static', filename="scripts.js") }}" defer></script>
</head>
<!-- templates/index.html -->
    <physique>
        <div class="container">
            <div class="upload-section">
                <div class="upload-form">
                    <h2>Add a file</h2>
                    <p>Connect the file beneath</p>
                    <type id="uploadForm" technique="put up" enctype="multipart/form-data">
                        <div class="upload-area" id="uploadArea">
                            <enter kind="file" id="uploadInput" title="uploadInput" settle for=".jpg, .jpeg, .png" required>
                            <label for="uploadInput">Drag file(s) right here to add.<br>Alternatively, you possibly can choose a file by <a href="#" onclick="doc.getElementById('uploadInput').click on(); return false;">clicking right here</a></label>
                        </div>
                        <div id="fileName" class="file-name"></div>
                        <button kind="submit" id="submitBtn">Add File</button>
                    </type>
                    <div id="loadingIndicator" fashion="show: none;">
                        <div class="spinner"></div>
                        <p>Loading...</p>
                    </div>
                </div>
                <div id="imageDisplay" class="image-display"></div>
            </div>
            <div id="responseOutput" class="response-output"></div>
        </div>


</physique>
</html>
CSS: Styling the WebApp
The CSS file enhances the visible presentation of the Meals Imaginative and prescient WebApp. It contains types for format, buttons, loading indicators, and responsive design to make sure a seamless consumer expertise.
physique {
    font-family: 'Roboto', sans-serif;
    background-color: #f4f4f4;
    margin: 0;
    padding: 0;
    shade: #333;
    overflow-y: auto; /* Permits scrolling as wanted */
    min-height: 100vh; /* Ensures no less than full viewport peak */
    show: flex;
    flex-direction: column; /* Adjusts route for content material movement */
}
.center-container {
    show: flex;
    align-items: middle;
    justify-content: middle;
    flex-grow: 1; /* Permits the container to develop */
}

.container {
    show: flex;
    flex-direction: column;
    justify-content: middle;
    align-items: middle;
    width: 100%;
    max-width: 100%;
    padding: 20px;
    background-color: #fff;
    box-shadow: 0 5px 15px rgba(0, 0, 0, 0.1);
    border-radius: 8px;
    flex-grow: 1;
    box-sizing: border-box; /* Add this line */
}

.upload-section {
    show: flex;
    width: 100%;
    justify-content: space-between;
    align-items: flex-start;
    margin-bottom: 20px;
}

.upload-form {
    width: 48%;
}

.image-display {
    width: 48%;
    text-align: middle;
}

h2 {
    shade: #444;
    margin-bottom: 10px;
}

p {
    margin-bottom: 20px;
    shade: #666;
}

/* Add space types */
.upload-area {
    border: 2px dashed #ccc;
    border-radius: 8px;
    padding: 20px;
    margin-bottom: 20px;
    cursor: pointer;
}

.upload-area enter[type="file"] {
    show: none;
}

.upload-area label {
    show: block;
    shade: #666;
    cursor: pointer;
}

.upload-area a {
    shade: #007bff;
    text-decoration: none;
}

.upload-area a:hover {
    text-decoration: underline;
}

.file-name {
    margin-bottom: 20px;
    font-weight: daring;
    shade: #444;
}

/* Button types */
button {
    padding: 10px 20px;
    border: none;
    border-radius: 8px;
    cursor: pointer;
    font-size: 1em;
    transition: background-color 0.3s ease, rework 0.2s ease;
    background-color: #007bff;
    shade: #fff;
}

button:hover {
    background-color: #0056b3;
    rework: translateY(-2px);
}

/* Loading indicator types */
#loadingIndicator {
    show: none;
    text-align: middle;
    margin-top: 20px;
}

.spinner {
    border: 4px stable rgba(0, 0, 0, 0.1);
    border-top: 4px stable #007bff;
    border-radius: 50%;
    width: 40px;
    peak: 40px;
    animation: spin 1s linear infinite;
    margin: 0 auto;
}

@keyframes spin {
    0% { rework: rotate(0deg); }
    100% { rework: rotate(360deg); }
}

/* Picture show types */
#imageDisplay img {
    max-width: 100%;
    peak: auto;
    border-radius: 8px;
    box-shadow: 0 4px 6px rgba(0, 0, 0, 0.1);
}

/* Response output types */
.response-output {
    width: 100%;
}

#responseOutput {
    text-align: left;
    margin-top: 20px;
}

#responseOutput h2 {
    shade: #333;
    margin-bottom: 10px;
    font-size: 1.5em;
}

#responseOutput pre {
    white-space: pre-wrap;
    padding: 10px;
    background-color: #f9f9f9;
    border: 1px stable #ddd;
    border-radius: 8px;
    font-size: 1em;
}
Flask Software (app.py)
The app.py file powers the Meals Imaginative and prescient WebApp by managing routes and dealing with picture uploads. It integrates with the Gemini Flash 1.5 mannequin to offer dietary evaluation and responses.
Step1: Setting Up Important Libraries
This part imports the mandatory libraries and modules for the Flask software. These embody Flask for net improvement, google.generativeai for interacting with the Gemini API, and PIL for picture processing.
from flask import Flask,render_template,request, redirect, url_for,jsonify
import google.generativeai as genai
from PIL import Picture
import base64
import io
import os
Step2: Gemini API Configuration
Right here, you configure the Gemini AI library utilizing your API key. This setup ensures that the appliance can talk with the Gemini API to course of picture knowledge and generate dietary info.
my_api_key_gemini = os.getenv('GOOGLE_API_KEY')
genai.configure(api_key=my_api_key_gemini)
Step3: Getting the API Key
Acquire your API key from the Google AI Studio. This secret is essential for authenticating requests to the Gemini API.
Go to Google AI Studio right here and get your API key.

Step4: Retailer Your API key in .env file
Save your API key in a .env file to maintain it safe and simply accessible. The appliance retrieves the important thing from this file to configure the Gemini API.
GOOGLE_API_KEY="Your_API_KEY"- my_api_key_gemini = os.getenv(‘GOOGLE_API_KEY’): This retrieves your Google API key from an surroundings variable named GOOGLE_API_KEY.
- genai.configure(api_key=my_api_key_gemini): This configures the Gemini AI library to make use of your API key for making requests.
Step5: Creating routes
On this step, you create the routes for the Flask software. These routes deal with requests and responses, together with rendering the homepage and processing file uploads.
app = Flask(__name__)

@app.route("https://www.analyticsvidhya.com/")
def index():
    return render_template('index.html')
Step6: Creating Flask Route
Making a well-structured Flask route for dealing with a picture add, processing it, and sending it to the Gemini Flash 1.5.
@app.route('/add', strategies=['POST'])
def add():
uploaded_file = request.information['uploadInput']
if uploaded_file:
picture = Picture.open(uploaded_file)
# Guarantee right mime kind primarily based on file extension
if uploaded_file.filename.endswith('.jpg') or uploaded_file.filename.endswith('.jpeg'):
mime_type="picture/jpeg"
elif uploaded_file.filename.endswith('.png'):
mime_type="picture/png"
else:
return jsonify(error="Unsupported file format"), 400
# Encode picture to base64 for sending to API
buffered = io.BytesIO()
picture.save(buffered, format=picture.format)
encoded_image = base64.b64encode(buffered.getvalue()).decode('utf-8')
image_parts = [{
"mime_type": mime_type,
"data": encoded_image
}]
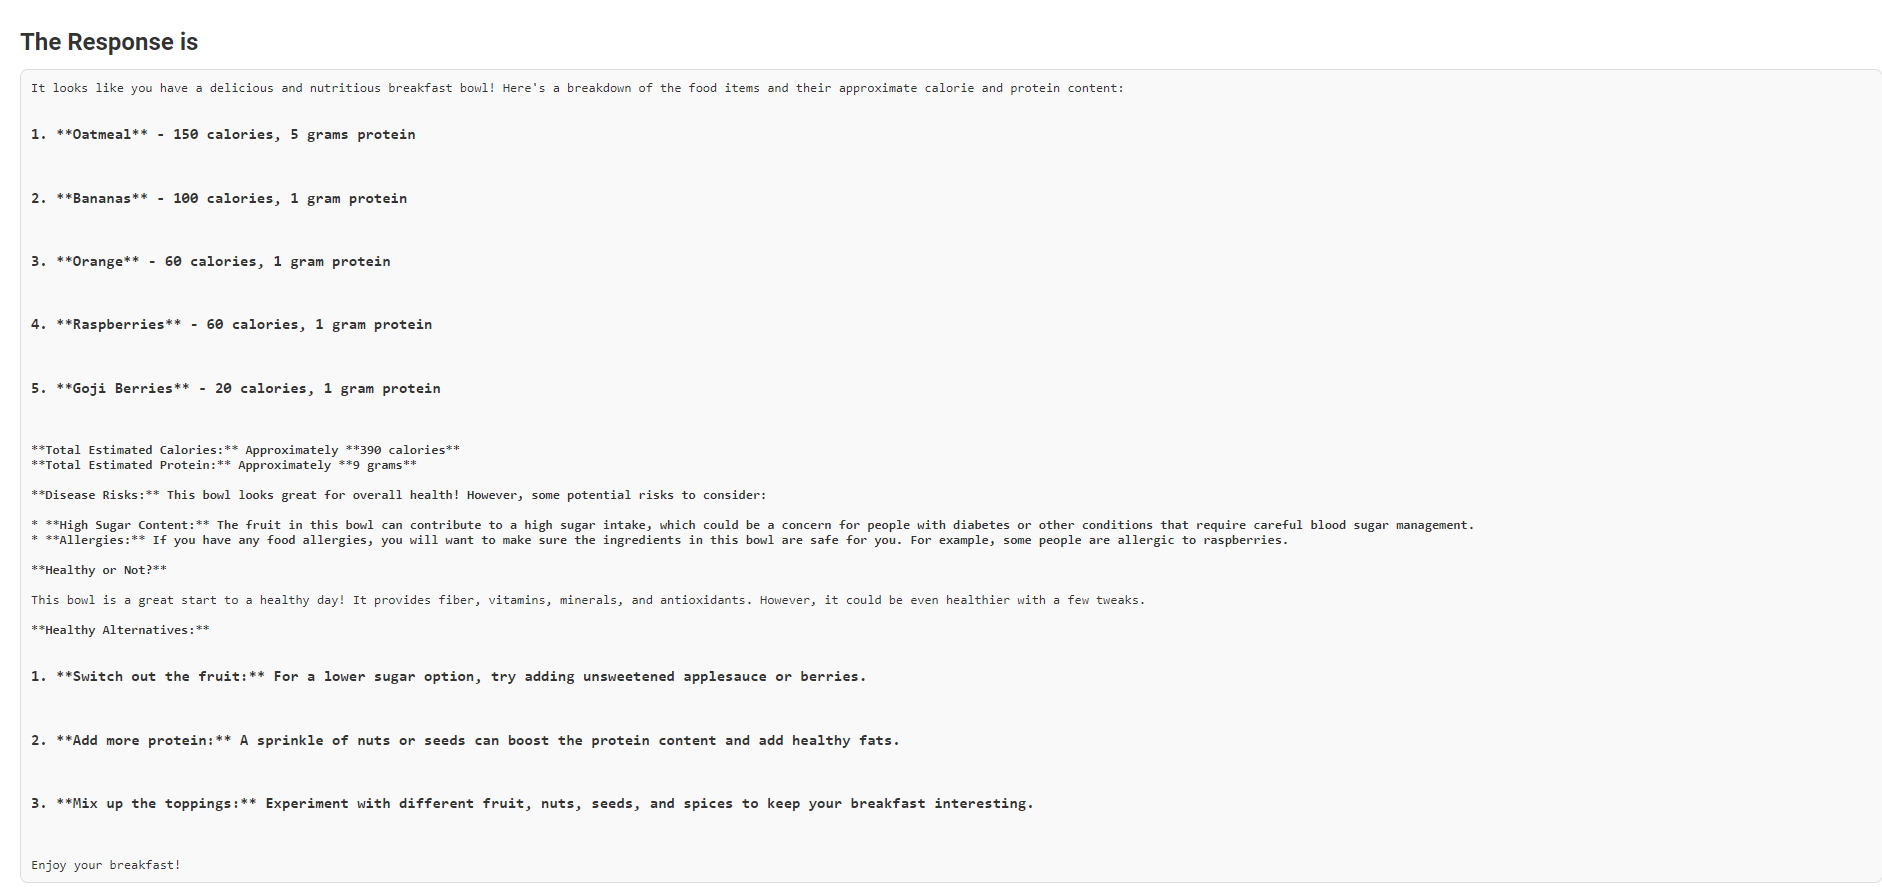
input_prompt = """
You're an skilled in nutritionist the place you should see the meals gadgets from the picture
and calculate the whole energy, additionally present the small print of each meals gadgets with energy consumption
is beneath format
1. Merchandise 1 - no of energy, protein
2. Merchandise 2 - no of energy, protein
----
----
Additionally point out illness danger from these things
Lastly you may as well point out whether or not the meals gadgets are wholesome or not and Recommend Some Wholesome Different
is beneath format
1. Merchandise 1 - no of energy, protein
2. Merchandise 2 - no of energy, protein
----
----
"""
# Simulate API response
model1 = genai.GenerativeModel('gemini-1.5-flash')
response = model1.generate_content([input_prompt, image_parts[0]])
end result = response.textual content
return jsonify(end result=end result, picture=encoded_image)
return jsonify(error="No file uploaded"), 400Step7: Operating the Software
Execute the Flask app with app.run(debug=True) to begin the server. This gives an area improvement surroundings the place you possibly can check and debug the appliance.
from flask import Flask,render_template,request, redirect, url_for,jsonify
import google.generativeai as genai
from PIL import Picture
import base64
import io
import os
my_api_key_gemini = os.getenv('GOOGLE_API_KEY')
genai.configure(api_key=my_api_key_gemini)
app = Flask(__name__)

@app.route("https://www.analyticsvidhya.com/")
def index():
    return render_template('index.html')

@app.route('/add', strategies=['POST'])
def add():
    uploaded_file = request.information['uploadInput']

    if uploaded_file:
        picture = Picture.open(uploaded_file)

        # Guarantee right mime kind primarily based on file extension
        if uploaded_file.filename.endswith('.jpg') or uploaded_file.filename.endswith('.jpeg'):
            mime_type="picture/jpeg"
        elif uploaded_file.filename.endswith('.png'):
            mime_type="picture/png"
        else:
            return jsonify(error="Unsupported file format"), 400

        # Encode picture to base64 for sending to API
        buffered = io.BytesIO()
        picture.save(buffered, format=picture.format)
        encoded_image = base64.b64encode(buffered.getvalue()).decode('utf-8')

        image_parts = [{
            "mime_type": mime_type,
            "data": encoded_image
        }]

        input_prompt = """
            You're an skilled in nutritionist the place you should see the meals gadgets from the picture
            and calculate the whole energy, additionally present the small print of each meals gadgets with energy consumption
            is beneath format

            1. Merchandise 1 - no of energy, protein
            2. Merchandise 2 - no of energy, protein
            ----
            ----
            Additionally point out illness danger from these things
            Lastly you may as well point out whether or not the meals gadgets are wholesome or not and Recommend Some Wholesome Different
            is beneath format
            1. Merchandise 1 - no of energy, protein
            2. Merchandise 2 - no of energy, protein
            ----
            ----
        """

        # Simulate API response (substitute with precise API name)
        model1 = genai.GenerativeModel('gemini-1.5-flash')
        response = model1.generate_content([input_prompt, image_parts[0]])
        end result = response.textual content

        return jsonify(end result=end result, picture=encoded_image)

    return jsonify(error="No file uploaded"), 400

if __name__ == "__main__":
    app.run(debug=True)
Output:
The output can be a JSON response containing the dietary evaluation and well being suggestions primarily based on the uploaded meals picture. The evaluation contains particulars like energy, protein content material, potential well being dangers, and recommendations for more healthy alternate options.
Get the code from my GitHub Repo: right here.
Conclusion
Gemini Flash 1.5 advances the state of AI fashions by addressing core necessities with enhanced pace, effectivity, and scalability. It goals to satisfy the calls for of immediately’s fast-moving digital world. Armed with fairly just a few highly effective efficiency options, versatile tuning assist, and broadened scope in textual content, picture, and structured knowledge duties, Gemini Flash 1.5 empowers builders to construct extremely artistic AI options with energy and cost-effectiveness. It’s light-weight, excessive in quantity for processing; therefore, it serves as an excellent selection for real-time cell apps and enormous enterprise programs.
Key Takeaways
- Gemini Flash 1.5 optimizes high-volume duties. It options quick processing, with as many as 1000 requests per minute, making it fairly very best for functions that require real-time responses.
- It gives tuning assist in order that builders can additional tune the mannequin to satisfy particular necessities with out incurring further value, therefore making it adaptable to be used circumstances.
- It now helps textual content, JSON, and pictures, so Gemini Flash 1.5 can do the whole lot from picture classification to structured knowledge output.
- Google AI Studio gives an accessible platform for integrating and managing Gemini Flash 1.5, with options like JSON schema mode and cell assist enhancing the general developer expertise.
- The elimination of the each day request restrict and the flexibility to deal with numerous requests per minute make Gemini Flash 1.5 appropriate for scalable functions, from cell apps to large-scale enterprise options.
Steadily Requested Questions
A. Gemini Flash 1.5 is a light-weight, cost-efficient AI mannequin developed by Google, optimized for high-volume duties with low latency. It’s a part of the Gemini 1.5 launch, alongside the Gemini 1.5 Professional variant.
A. Gemini Flash 1.5 is designed for sooner and more cost effective processing, making it very best for high-volume duties. Whereas each fashions share similarities, Flash 1.5 optimizes pace and scalability for eventualities the place these elements are crucial.
A. Key options embody enhanced efficiency with 1000 requests per minute, tuning assist for personalisation, JSON schema mode for structured outputs, and cell assist with gentle mode in Google AI Studio.
A. Sure, tuning assist is accessible for Gemini Flash 1.5, permitting you to customise the mannequin in accordance with your particular wants. Tuning is at the moment freed from cost, with no further per-token prices.
A. Sure, Gemini Flash 1.5 helps picture processing, making it appropriate for duties akin to picture classification and object detection, along with textual content and JSON dealing with.
The media proven on this article isn’t owned by Analytics Vidhya and is used on the Writer’s discretion.